How To Take A Headshot 2026 | LinkedInHeadshots.ai
By Stephen on June 6, 2025
What is how to take a headshot?
Professional headshots and profile photos help you stand out on LinkedIn and at work. You can use a photographer or an AI headshot service like LinkedInHeadshots.ai for from €29, with delivery in about 30 minutes and many styles to choose from.
Key facts
- Professional headshots: clear, well-lit, simple background.
- LinkedInHeadshots.ai: from €29, 30 min, 40–200 headshots.
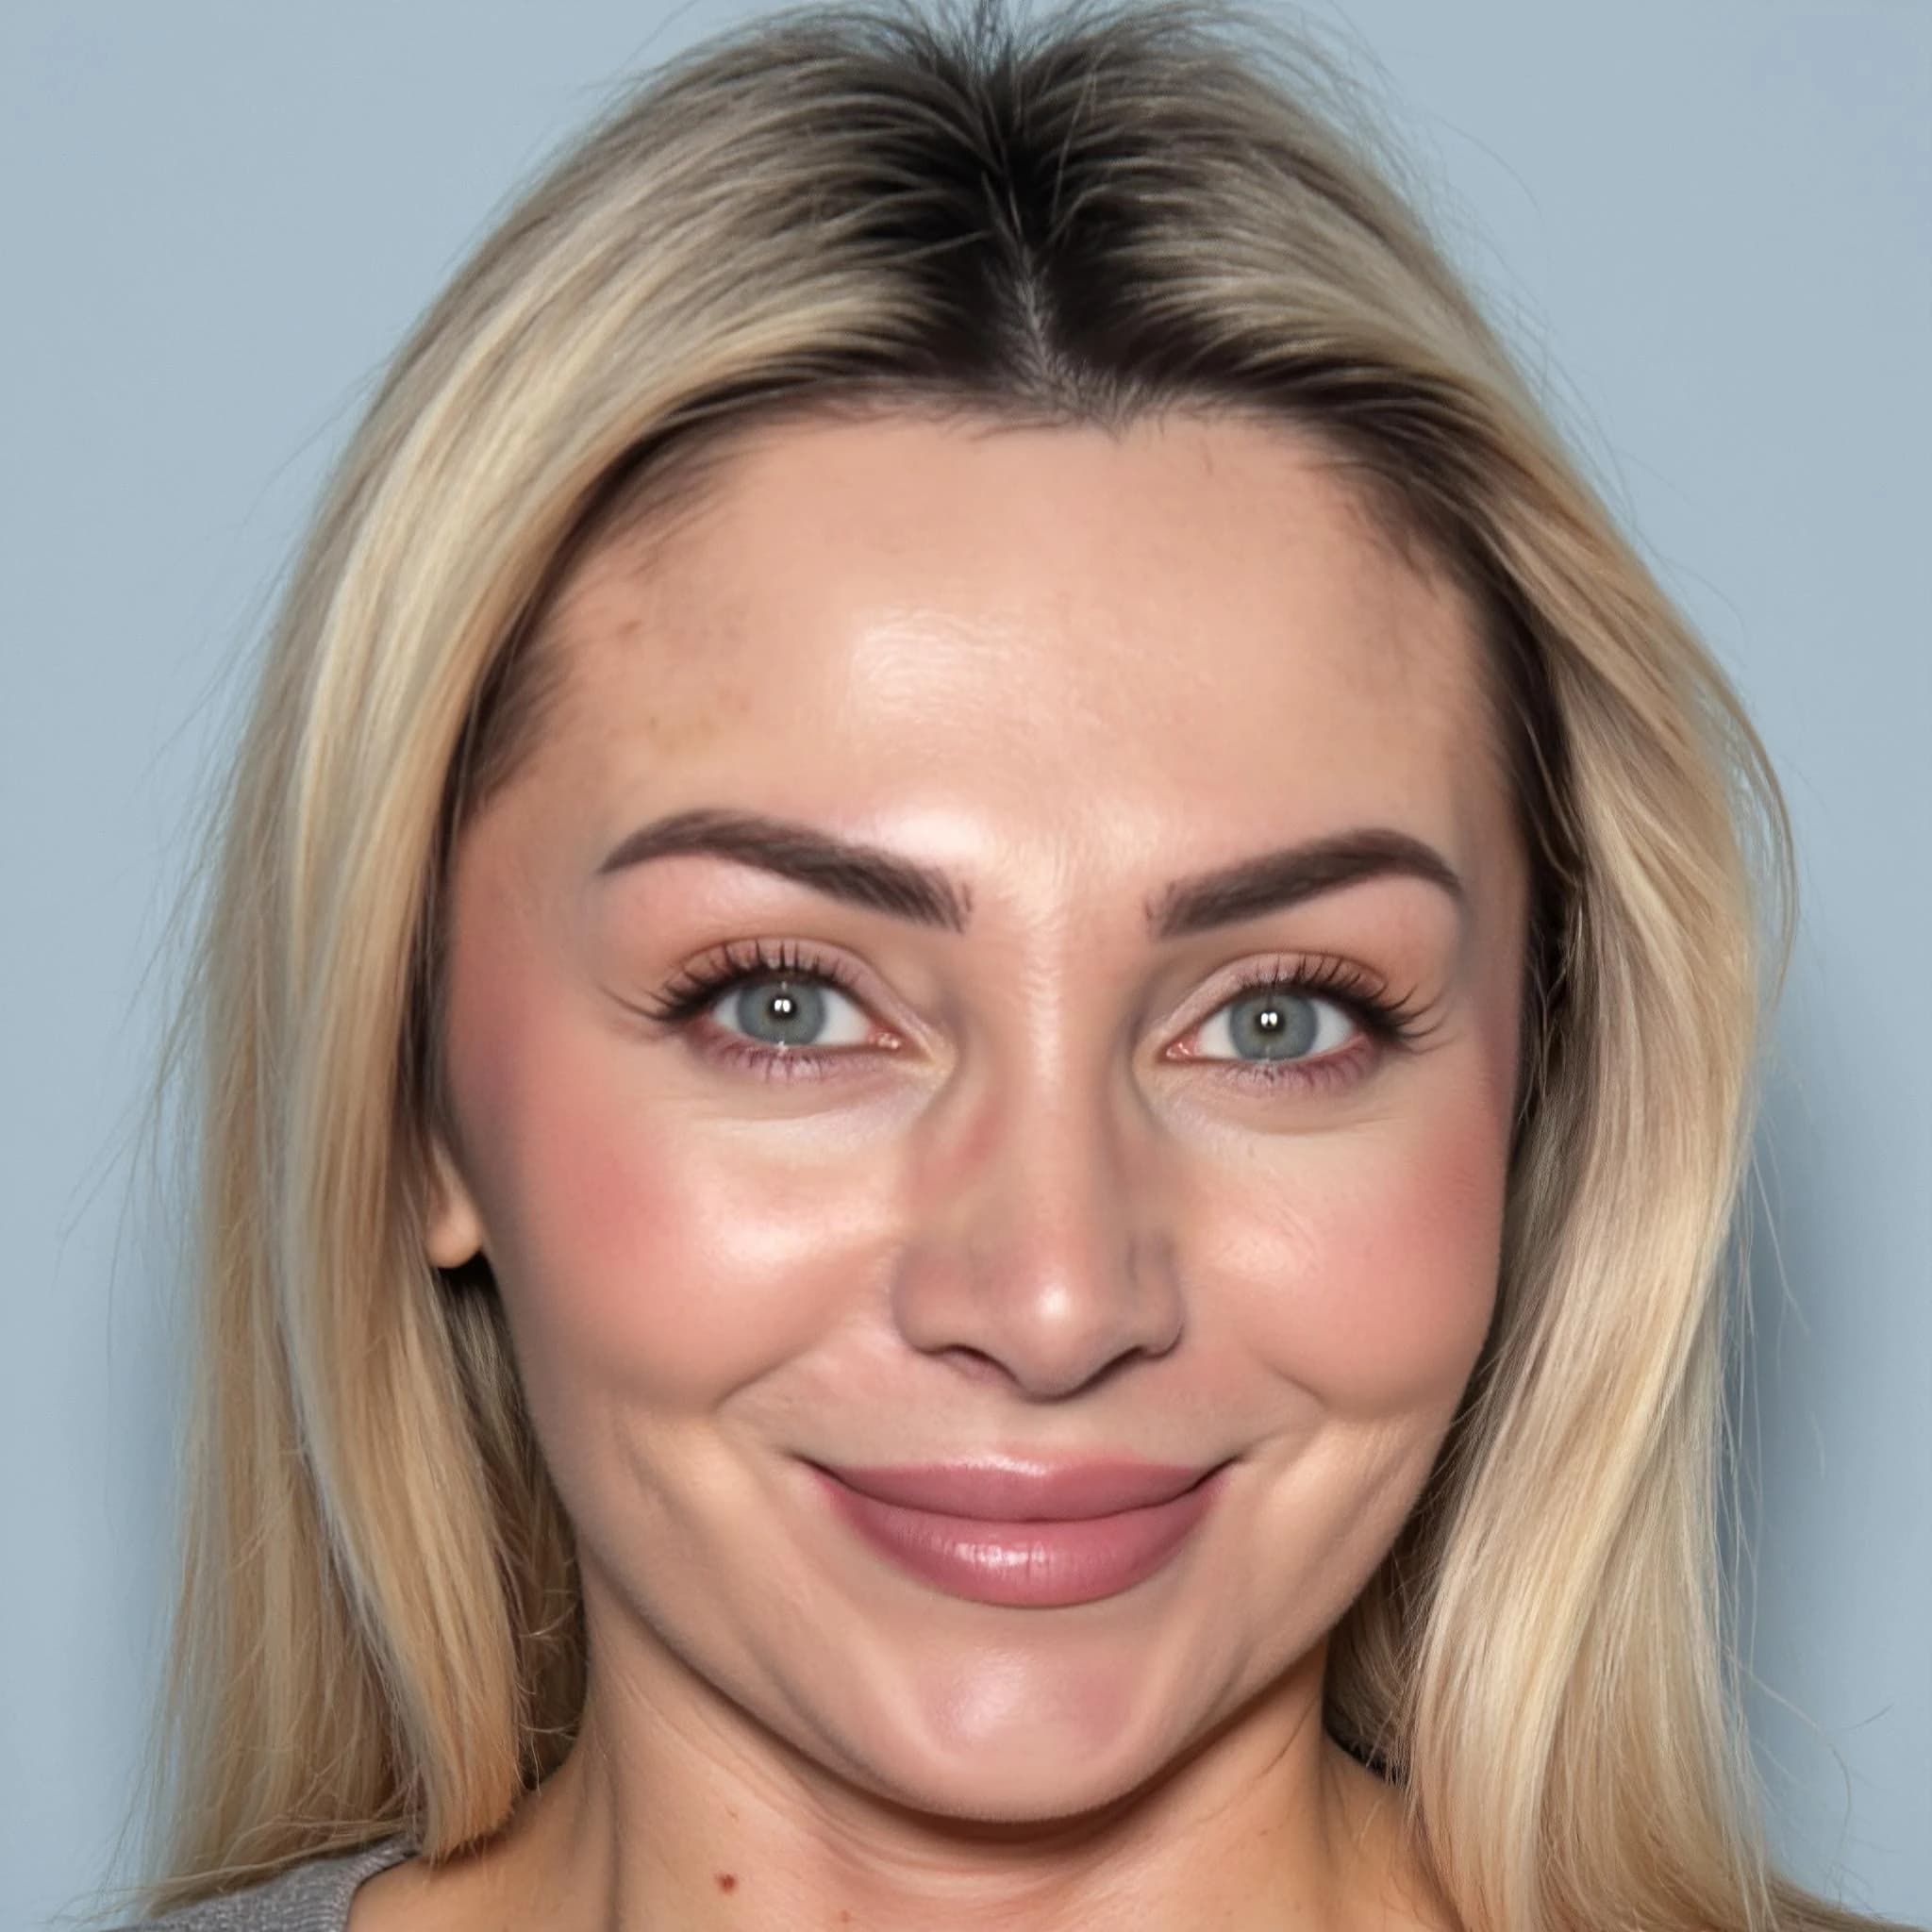
What Separates Outstanding Headshots From Ordinary Ones

A forgettable headshot won't do you any favors. A truly effective headshot, however, can significantly impact your professional image. It serves as your first impression in the digital realm. Your headshot should project professionalism, approachability, and a touch of your unique personality. But what are the key ingredients for achieving this?
The Psychology of a Compelling Headshot
A great headshot goes beyond simply looking good; it's about forging a genuine connection with the viewer. Authenticity is key. Think of it like meeting someone in person: a sincere smile and direct eye contact foster trust and engagement. This principle applies directly to your headshot, encouraging viewers to want to know more about you. Body language also plays a vital role. Even subtle adjustments, such as a slight head tilt or relaxed shoulders, can communicate confidence and ease.
Key Elements of a Standout Headshot
Several crucial components contribute to a truly exceptional headshot. First and foremost is eye contact. It establishes a direct link with the viewer, drawing them in and making you seem accessible. A genuine expression is equally important. A forced smile can appear contrived, while a natural expression radiates warmth and personality. Lastly, strategic body language, as mentioned earlier, subtly conveys confidence and professionalism.
- Eye Contact: Direct gaze creates a connection and fosters trust.
- Genuine Expression: Natural expressions project warmth and personality.
- Strategic Body Language: Subtle cues, like relaxed shoulders, convey confidence.
Adapting Your Headshot to Different Contexts
While the core principles of a strong headshot remain constant, the specific style may need to be adjusted for different professional settings. A corporate headshot typically calls for more formal attire and a simple backdrop. A headshot for a creative field might offer more flexibility for individual expression. This doesn't mean compromising authenticity but rather aligning your presentation with the norms of your industry.
The UK Headshot Landscape
Current trends in UK headshot photography prioritize authenticity and a cinematic look. This means stepping away from heavily edited, artificial images and embracing a more natural and engaging style. This reflects an industry-wide evolution, with photographers tailoring their services, such as providing in-person viewings, to better serve clients. Learn more about this trend. Ultimately, investing in a high-quality headshot is an investment in your professional brand, helping you create a lasting positive first impression.
Building Your Headshot Kit Without Breaking The Bank
Creating professional headshots doesn't require expensive equipment. It's about understanding how to use the tools you have effectively, focusing on lighting, composition, and posing. Whether you're working with a smartphone or a DSLR, these core principles remain the same.
Smartphone Setups That Rival Professional Cameras
Modern smartphones offer surprisingly powerful cameras perfectly capable of producing high-quality headshots. A few key accessories can elevate your results. A tripod will provide stability, eliminating blur and ensuring consistent framing. A clip-on lens kit, which often includes wide-angle and macro lenses, can expand your creative options. And a portable LED light, like a small ring light attached to your phone, ensures consistent, flattering illumination, especially useful in challenging lighting situations.
- Tripod: Provides stability and consistent framing.
- Clip-on Lens Kit: Offers a range of focal lengths for creative control.
- Portable LED Light: Ensures consistent and flattering illumination.
DSLR Kits That Grow With Your Skills
If you're ready to invest in more advanced equipment, a DSLR camera provides greater control and flexibility. An entry-level DSLR body paired with a 50mm or 85mm prime lens is a great starting point. These lenses are known for their ability to create a pleasing blurred background and flattering perspective. A speedlight combined with a softbox or umbrella will give you more professional lighting control than a built-in flash, diffusing the light for a softer, more natural look. This combination allows for creative control over depth of field and lighting, two crucial aspects of professional headshots.
- Entry-Level DSLR Body: Offers more control and future expansion options.
- 50mm or 85mm Prime Lens: Creates a blurred background and flattering perspective.
- Speedlight with Softbox/Umbrella: Provides diffused, professional-quality lighting.
To help you choose the best equipment for your needs and budget, take a look at the comparison table below:
Headshot Equipment Comparison by Budget
A comprehensive comparison of equipment options across different budget ranges for headshot photography.
| Equipment Type | Budget Option (£0-100) | Mid-Range (£100-500) | Professional (£500+) |
|---|---|---|---|
| Camera | Smartphone with built-in camera | Entry-level DSLR | Professional DSLR |
| Lens | Clip-on lens kit | 50mm or 85mm prime lens | High-end prime lenses (e.g., 85mm f/1.2) |
| Lighting | Portable LED light / Ring light | Speedlight with softbox/umbrella | Studio strobe lights with modifiers |
| Support | Tripod | Tripod | Heavy-duty tripod |
This table provides a general overview of equipment options. Remember that you can mix and match elements to create a setup that works best for you. For example, you could use a mid-range camera with professional lighting.
Understanding Aperture and Depth of Field
Aperture, measured in f-stops, controls the amount of light entering the lens and affects the depth of field. A wider aperture (lower f-stop number, like f/1.8) creates a shallow depth of field, blurring the background and keeping the subject sharp. A narrower aperture (higher f-stop number, like f/8) increases the depth of field, bringing more of the background into focus.

The infographic illustrates how the distance from the subject influences background blur at different apertures. For headshots, a wider aperture (f/1.8) might blur the background at just one foot away, while f/8 requires considerably more distance (8ft) for the same effect. Choosing the right aperture is crucial for controlling background blur and achieving a professional look.
Lighting Solutions for Any Space
Effective lighting is essential for great headshots. Natural window light is often the most flattering and readily available source. Position your subject facing the window for soft, diffused lighting. For smaller spaces or when natural light is limited, a ring light provides an affordable and effective solution, delivering even illumination and a distinctive catchlight in the eyes. Reflectors, even simple white foam boards, can bounce light back onto the subject, filling in shadows and creating a more balanced image.
- Window Light: Soft, diffused, and readily available.
- Ring Light: Affordable and provides even illumination with a catchlight.
- Reflector: Fills in shadows for a balanced image.
Building your headshot kit doesn't need to be intimidating or expensive. By understanding these key elements and making informed choices, you can create a setup that produces stunning results on any budget. Whether you opt for a smartphone or a DSLR, these tips and tricks will elevate your headshots to a professional level. The key is not just the equipment, but how you use it.
Mastering Light To Transform Your Headshot Game

Light is the key to a truly captivating headshot. It can make or break your final image, shaping features and creating depth and dimension. Understanding how to work with light is essential for elevating your headshots. We'll explore why natural light, especially from a window, is so effective and how you can use it to your advantage.
Harnessing The Power of Window Light
Window light is a favorite among photographers, often producing the most flattering results. It’s soft, diffused, and readily available. Positioning your subject facing the window creates beautiful, even illumination. This minimizes harsh shadows and highlights natural features. However, even window light changes throughout the day. Midday sun can be intense, creating strong shadows, while overcast days offer a softer, more diffused light. Adapting to these changes is crucial for achieving consistent results.
Understanding Key Light Positioning and Shadows
The key light, your primary light source, sets the overall mood and feel of your headshot. Positioning the key light slightly to the side of your subject, at about a 45-degree angle, creates dimension and avoids a flat look. This angle also helps sculpt the face, emphasizing cheekbones and adding depth. Managing shadows is equally important. Rather than eliminating them entirely, use shadows to enhance features and add definition.
The Importance of Catchlight and Working With Harsh Light
A catchlight is the small reflection of your light source in the subject’s eyes. It adds a spark of life and increases eye engagement. Ensure there's enough light to create this vital detail, even on cloudy days. Sometimes you’ll encounter harsh light, especially when shooting outdoors in bright sunlight. In these situations, diffusing the light is essential. A simple diffuser or even a thin white sheet can soften the light, minimizing harsh shadows and preventing overexposure. You might be interested in: How to master your lighting setup.
Adapting Your Approach For Different Face Shapes and Complexions
Different face shapes and complexions benefit from different lighting strategies. A broad light source can widen a narrow face, while a narrower source can slim a wider one. Adjusting the intensity and direction of your light can also balance uneven skin tones and highlight desirable features. Understanding how light interacts with various skin tones is vital for creating flattering and authentic headshots.
Advanced Lighting Techniques For Professional Results
Once you’ve mastered the basics, explore more advanced techniques. Reflectors can bounce light back onto the subject, filling in shadows and creating a more balanced image. Lighting ratios, the balance between your key light and fill light, can dramatically impact the mood. A higher ratio creates more contrast and drama, while a lower ratio produces a softer look. Consistent lighting across multiple headshots is also key, particularly for teams or companies, ensuring a cohesive and professional appearance. This is especially important for professional portfolios. These advanced techniques allow you to fine-tune your lighting for technically sound and aesthetically pleasing images.
Camera Settings That Actually Matter For Headshots
Getting the right camera settings is essential for professional headshots. Instead of guessing, let's explore the technical aspects that influence your image quality. This knowledge empowers you to take control and achieve your desired results.
Aperture: Controlling Depth of Field
Aperture, indicated by the f-stop number, affects both the light entering your lens and the depth of field. A wider aperture (a lower f-stop like f/2.8) allows more light and creates a shallow depth of field, blurring the background while keeping your subject sharp. This blurred background, also called bokeh, isolates the subject and creates a professional look. Conversely, a narrower aperture (like f/8) increases depth of field, bringing more of the background into focus. For headshots, a wider aperture is generally preferred for that sought-after background blur.
Shutter Speed: Freezing Motion
Shutter speed, the duration your camera's sensor is exposed to light, is crucial for sharp images. A fast shutter speed (1/250th of a second or faster) freezes motion, eliminating camera shake and capturing fleeting expressions. Slower shutter speeds can blur the image, especially in low light. A tripod can stabilize your camera, letting you use slower shutter speeds when needed.
ISO: Balancing Light and Noise
ISO measures your camera's sensitivity to light. A lower ISO (like 100) yields cleaner images with minimal noise in well-lit settings. In low light, increasing the ISO (to 400 or 800) brightens the image, but introduces noise or grain. Find the lowest ISO that gives adequate exposure without excessive noise for the best image quality. Check out our guide on how to master taking headshots.
Focusing for Sharp Eyes
Sharp focus on the eyes is paramount for headshots. Single-point autofocus allows you to select a specific focus point, typically the subject's eye, giving you precise control. Eye-tracking autofocus, found in newer cameras, automatically detects and focuses on the eyes. These features help achieve critical sharpness, drawing attention to the subject's eyes.
White Balance: Accurate Colors
White balance ensures accurate color rendering, crucial for natural skin tones. Camera presets for various lighting conditions (daylight, cloudy, fluorescent) are helpful starting points. Manual white balance adjustments offer greater precision, avoiding unrealistic color casts.
File Format: JPEG vs. RAW
The shooting format impacts post-processing flexibility. JPEG is compressed, creating smaller files, but offers less editing latitude. RAW files retain more image data, providing greater control over exposure, white balance, and shadows during editing in software like Adobe Lightroom. While RAW files are larger, they permit more extensive edits without sacrificing quality.
Recommended Camera Settings for Different Headshot Scenarios
The table below provides a quick reference for recommended camera settings in various headshot situations.
| Scenario | Aperture | Shutter Speed | ISO | Focus Mode |
|---|---|---|---|---|
| Outdoor, sunny | f/4 - f/5.6 | 1/250 or faster | 100 | Single-point/Eye-tracking |
| Outdoor, overcast | f/2.8 - f/4 | 1/125 or faster | 200-400 | Single-point/Eye-tracking |
| Indoor, window light | f/2.8 - f/4 | 1/60 - 1/125 | 400-800 | Single-point/Eye-tracking |
| Indoor, studio light | f/4 - f/8 | 1/125 or faster | 100-200 | Single-point/Eye-tracking |
These are guidelines; adjust them based on your specific lighting and environment. Experimentation and practice are key to mastering these technical aspects and consistently producing exceptional headshots.
Directing Natural, Confident Poses That Actually Work

Even the most camera-shy person can project confidence in a headshot with proper guidance. This isn't about contrived poses, but rather helping your subject relax and let their true personality shine. This section will cover communication techniques and small adjustments that significantly impact how to take a successful headshot. For more in-depth information, you can explore this article: How to master posing for a headshot.
Communication Is Key: Putting Your Subject at Ease
The foundation of a natural pose is a relaxed subject. Begin by fostering a comfortable atmosphere. Chat with them, offer positive reinforcement, and explain the process clearly. This builds rapport and eases any potential anxiety. A genuine connection between photographer and subject translates into more authentic and captivating photographs.
The Power of Subtle Adjustments
Minor changes can have a major impact. Shoulder angles are key to conveying confidence. A slight turn away from the camera, instead of shoulders squared directly at the lens, creates a more dynamic and approachable look. Chin positioning is also essential. A slightly lifted and extended chin is flattering for most face shapes and helps avoid a double chin. Eye direction establishes connection. Direct eye contact is generally preferred, but subtle variations can add depth and personality.
Guiding Principles for Natural Posing
- Relaxed Posture: Encourage a comfortable stance or seated position, avoiding stiffness.
- Engaging Hands: Give hands a purpose – holding a small object, lightly touching the face, or resting naturally at their sides. Avoid clenched fists or awkward hand placement.
- Authentic Expressions: Encourage genuine smiles and expressions that reflect the individual's personality. Avoid forced or unnatural smiles.
Working with Glasses and Accessories
If your subject wears glasses, watch out for reflections. Adjusting the lighting or their head position can minimize glare. Accessories can enhance personality, but keep them minimal and professional. They should complement the overall look without distracting from the subject's face.
Adapting Your Approach for Different Personalities
Comfort levels in front of the camera vary greatly. For extroverted individuals, encourage dynamic poses and expressions. For introverted subjects, create a more relaxed setting and focus on subtle adjustments that project quiet confidence. Tailor your directing style to each personality to create authentic images that represent their professional best.
The Growing Demand for Professional Headshots
The importance of a professional headshot goes beyond simply looking good. It's a crucial element of your professional brand, especially in competitive markets like the UK. The UK photography market is projected to reach £1.9 billion by 2025, driven by the growing need for high-quality visuals in digital marketing, e-commerce, and social media. This underscores the increasing significance of a strong visual presence. Find more detailed statistics here. Investing in high-quality headshots is essential for professionals to accurately represent their brand and make a lasting impression.
Editing That Enhances Without Looking Fake
Professional editing is the key to transforming a good headshot into something truly exceptional. The goal isn't to drastically alter your appearance, but to enhance your natural features. You want a polished, professional look that still feels authentic. This section explores essential editing techniques, using both free and professional software like Adobe Photoshop, to achieve this.
Skin Retouching: Enhancing, Not Erasing
Skin retouching is crucial for headshot editing. The aim is a smooth, healthy complexion, not artificial-looking skin. Address blemishes or temporary imperfections with the spot healing brush or clone stamp tool. Moderation is key. Over-retouching can create a “plastic” look, erasing natural texture.
Color Correction for Accurate Skin Tones
Correcting color casts and ensuring accurate skin tones is vital. Use white balance adjustment tools to neutralize unwanted color tints, especially if the photoshoot lighting wasn't ideal. Fine-tuning the saturation and vibrance can enhance natural skin color without over-processing. Aim for a realistic, healthy complexion.
Exposure Adjustments: Finding the Optimal Brightness
Adjusting the exposure, highlights, and shadows fine-tunes the overall brightness and contrast. Bring out detail in the shadows without losing highlights, creating a balanced image. This can dramatically improve the headshot, particularly if the original was under- or overexposed.
Sharpening Techniques for Expressive Eyes
Sharpening enhances details, especially the eyes. Use sharpening tools carefully to make eyes pop without adding noise or halo effects. A small amount can significantly increase impact, but too much creates a harsh look.
Common Editing Mistakes to Avoid
Several editing pitfalls can make a headshot look amateurish. Over-retouching skin and over-sharpening are major ones. Unnatural color correction, resulting in unrealistic skin tones, is another. Authenticity is paramount, so aim for natural-looking enhancements.
Professional Workflows for Consistent Results
Consistency across multiple headshots is important, especially for teams. Professional software allows for presets, which are saved settings that automate adjustments for color, exposure, and sharpening. This ensures consistent results for every image, especially helpful for photos from the same shoot.
Advanced Techniques: Presets and Preparing Images for Different Uses
Beyond basic edits, advanced options further refine headshots. Custom presets offer greater control and consistency. Preparing images for different uses—social media versus print, for example—requires specific adjustments to size and resolution. Understanding these ensures your headshot looks its best, regardless of platform.
By mastering these techniques and avoiding common mistakes, you can elevate your headshots. The goal isn’t a fake image, but to enhance your natural features and present your most professional self. With careful attention to detail and a focus on authenticity, your headshot can make a lasting impression.
Building Your Headshot Photography Business Strategy
Turning your headshot photography skills into a profitable business requires a well-defined strategy. This involves understanding the nuances of the UK market, establishing competitive pricing, and effectively marketing your services. Let's explore how to build a successful headshot photography business in the UK.
Understanding the UK Headshot Market
The UK presents diverse opportunities for headshot photographers. Demand comes from various sectors, from corporate teams needing professional headshots to individuals seeking profile pictures for platforms like LinkedIn. Recognizing these distinct needs allows you to tailor your services and target specific client segments. Corporate clients often prioritize efficiency and a consistent brand image, while individual clients may value a more personalized and creative approach.
Setting Competitive Pricing and Packaging Your Services
Strategic pricing is crucial. Researching what other photographers in your area charge for similar services establishes a competitive baseline. Factor in your experience, skill level, and the unique value you bring. Consider offering packaged services to cater to different budgets and needs. A basic package might include a set number of edited digital images, while a premium package could include additional services like professional hair and makeup or a wider variety of backdrops.
Crafting compelling packages adds value. Instead of selling individual headshots, create packages that address specific client needs. A "LinkedIn Profile Booster" package could combine a headshot session with personalized advice on optimizing LinkedIn profiles. This value-added approach positions you as a consultant, not just a photographer.
Effective Marketing for Headshot Photographers
Effective marketing is essential. A strong portfolio showcasing your best work is paramount. Demonstrate versatility by including diverse subjects, styles, and lighting setups. Creating separate portfolios targeted at different client types (corporate, actors, musicians) can be beneficial.
Instagram and LinkedIn are powerful marketing tools. Regularly sharing your work, engaging with potential clients, and showcasing client testimonials builds trust and credibility. Networking within local business communities and attending industry events can also generate leads and foster relationships.
The photography industry is constantly evolving. Roughly 10% of photographers now work across multiple business models, demonstrating the importance of adapting to market conditions. This could involve expanding into related areas like corporate event photography or personal branding consultations. Learn more about this evolving landscape.
Essential Business Considerations
Running a photography business also requires attention to practical aspects. Ensure compliance with all legal and tax obligations. Secure appropriate insurance to protect your business from liability. Use clear client contracts outlining services, pricing, usage rights, and other key terms.
Elevate Your Headshots with LinkedInHeadshots.ai
Building a successful headshot photography business takes dedication. For a quick and convenient way to enhance your online professional image, consider LinkedInHeadshots.ai. This AI-powered platform generates professional-quality headshots from selfies, providing a cost-effective solution for individuals and businesses.
Get your professional headshots
Studio-quality, LinkedIn-ready headshots in about 30 minutes — from €29, with full commercial rights.